Custom Instrument Support
The Semiconductor Test Library (STL) provides built-in support for commonly used instruments, such as NI-DCPower and NI-Digital. STL also provides the infrastructure for you to define custom instruments, allowing you to use additional instruments that are not natively supported such as FlexRIO or R-Series devices, third-party devices, or specific load-board hardware. You can define the unsupported instrument as a Custom Instrument within the pinmap and then leverage the provided interfaces and classes to abstract the device's driver and perform high-level operations on the instrument.
Note
Supported in Semiconductor Test Library 25.5 NuGet package or later.
Implementation Requirements
To use a custom instrument within your test program, you must first develop the necessary code implementations using the provided interfaces and classes.
ICustomInstrumentICustomInstrumentFactoryInitializeAndCloseCustomInstrumentSessionInformationCustomInstrumentSessionsBundle
The following steps must be repeated for each type of custom instrument that you need to support, which may vary between instrument vendors, class, or model.
- Create a concrete implementation for
ICustomInstrument. - Create a concrete implementation for
ICustomInstrumentFactory. - Create high-level setup and cleanup methods for initialization and cleanup of the instrumentation.
- Create high-level extension methods for performing operations with the instrumentation.
- Align the implementation to the appropriate pin map configuration.
The ICustomInstrument and ICustomInstrumentFactory interfaces are used to define concrete class implementations for wrapping the instrument's driver API.
The ICustomInstrumentFactory concrete class implementation is responsible for initially constructing the appropriate concrete ICustomInstrument object and designating the InstrumentTypeId to be used within the pin map definition.
Separate implementations of ICustomInstrument and ICustomInstrumentFactory are required for each type of custom instrument, or InstrumentTypeId, that you plan to support.
Note
Typically, the InstrumentTypeId can be used to identify how different instrument channels are intended to be grouped and defined within the pin map. Refer to How to Configure the Pin Map for more details.
Additionally, for each custom instrument type, you must write high-level methods to Setup and Cleanup the instrument driver session.
This is done by utilizing the concrete implementation of the ICustomInstrumentFactory interface with the Initialize and Close methods provided by the InitializeAndClose class.
The actual initialization and closure of the driver session will happen within the InitializeAndClose methods, as they abstract the pin map integration and invoke the appropriate Initialize and Close methods defined by the ICustomInstrument interface.
You may also choose to write an additional high-level method to Reset the instrumentation, when a reset operation is supported by the device driver.
Note
You should never need to directly invoke the Initialize and Close methods defined by the ICustomInstrument interface, as the library's abstraction takes care of this for you.
The CustomInstrumentSessionInformation class is used to encapsulate the ICustomInstrument object, enabling you to access the instrument driver's API session and associated pin-site information.
Finally, the CustomInstrumentSessionsBundle class is used to create high-level extension methods for performing driver operations that will be used to program the instrument within a test code module.
Similar to the extension methods provided by the library for natively supported instrument types, such as DCPower and Digital.
Tip
Create a new folder within your C# project specifically to organize the various source files you will create to support your custom instrument. This allows the best portability for reusing the custom instrument implementation in future projects.
1. Create a Custom Instrument Class
Create a new custom instrument class that implements ICustomInstrument interface. For example, "MyCustomInstrument"
- Add the following
usingdirective at the top of your .cs file to reference theICustomInstrumentinterface:using NationalInstruments.SemiconductorTestLibrary.InstrumentAbstraction.CustomInstrument; - Within the class constructor open a unique session reference to the instrument or channel group using the instrument driver's API. Then store that reference as a property within the class.
- The Instrument name and channel details should also be stored as part of object data.
- The class must Implement a
Closemethod to close the sessions reference to the instrument or channel-group. - The class must implement a
Resetmethod to reset instrument/channel-group.- If the devices does not support a reset operation then the body of this method can be left empty, but it's signature must still be defined.
Tip
Add a comment in the body of the Reset method to denote when a reset operation is not supported by the instrument.
2. Create a Custom Instrument Factory Class
Create a new concrete factory class implements the ICustomInstrumentFactory interface.
- The name of the class should match that of the custom instrument class you created. For example, "MyCustomInstrumentFactory".
- You will need to add the following
usingdirective at the top of your .cs file to reference theICustomInstrumentFactoryinterface:using NationalInstruments.SemiconductorTestLibrary.InstrumentAbstraction.CustomInstrument;. - The class must implement a
InstrumentTypeIdproperty, which provides unique identifier to denote the Instrument type and will be used within the pin map. - The class must implement the
CreateInstrumentmethod, which creates and returns a new instance of the object that implements theICustomInstrumentinterface. - The class must implement the
ValidateCustomInstrumentsmethod, which is used to validate the channel names and channel groups in the pin map are setup as expected for the specific instrument type.- The body of this method can be left empty, but the method signature must still be defined.
3. Create High-level Setup and Cleanup Methods
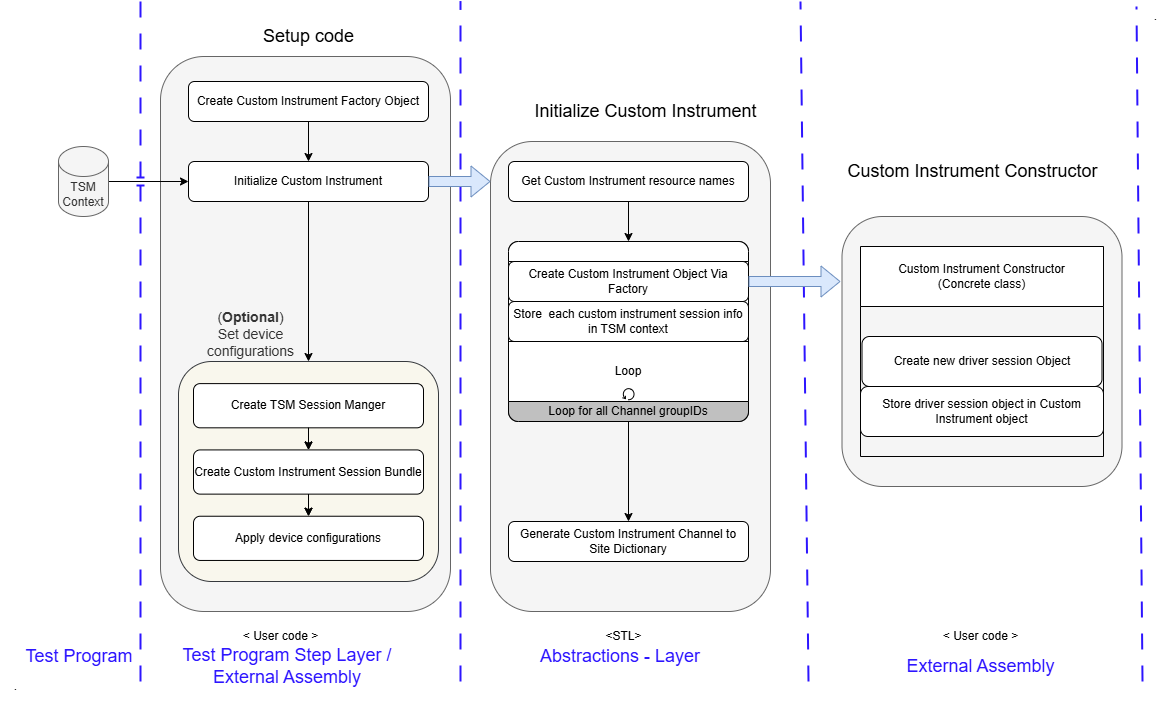
Create Setup and Cleanup methods which will be called from TestProgram/Test Sequence. The Setup method should take care of Initialization of the custom instruments. As part of the Setup method, an initial configuration for the instrument can also be applied (including pin specific configurations). The Cleanup code should take care of closing all references and resetting the instrumentation (when applicable).
3.1 Setup method
Create a new static class within your C# project and add a new Setup<NameOfCustomInstrumentType> method.
Where <NameOfCustomInstrumentType> is replaced by your custom instrument's name (i.e. the name of your concrete custom instrument class).
- You can create a new
SetupAndCleanupStepsclass in your project to declare the new Setup method within.- Alternatively, you can add this method to an existing class, if your project already contains a similar class.
- The method should create a new instance of the Custom Instrument Factory class.
- The method should call the
InitializeAndClose.Initializemethod, passing it the newly created Custom Instrument factory object as parameter.- Add the following
usingdirective to the top of your .cs file to reference the appropriateInitializeAndCloseclass:using NationalInstruments.SemiconductorTestLibrary.InstrumentAbstraction.CustomInstrument;.
- Add the following
- Optionally, you can perform any high-level operations to configuration the instrument upon its initial setup.
- It is recommended that you do so by creating a new session bundle object, as discussed in Using Extension Methods Within Test Code Modules
Refer to the Custom Instrument Example - SetupMyCustomInstruments Method in SetupAndCleanupSteps.cs as a reference for creating a Setup method.
Setup Code workflow
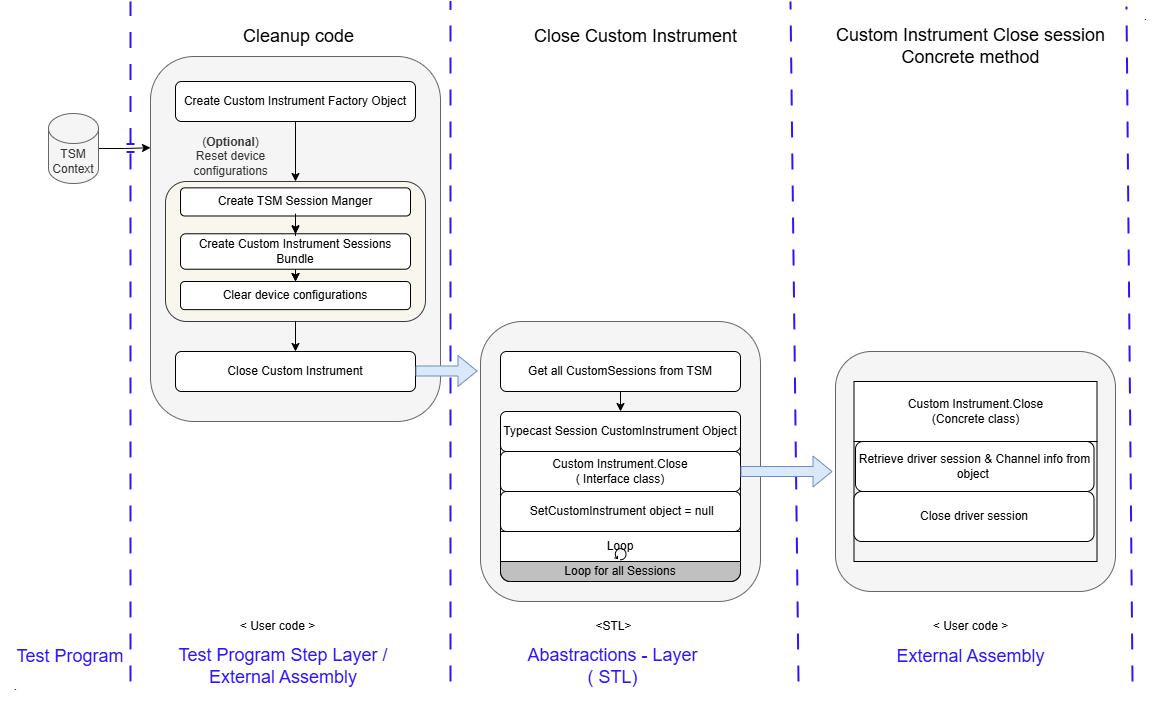
3.2 Cleanup method
Add a new Cleanup<NameOfCustomInstrumentType> method to the same class you added the setup method to.
Where <NameOfCustomInstrumentType> is replaced by your custom instrument's name (i.e. the name of your concrete custom instrument class).
- The method should call the
InitializeAndClose.Closemethod, passing it theInstrumentTypeIdproperty from the concrete Custom Instrument Factory class as parameter.- Before calling the
InitializeAndClose.Closemethod, ensure the device is properly powered down and configured, if necessary. - Add the following
usingdirective to the top of your .cs file to reference the appropriateInitializeAndCloseclass:using NationalInstruments.SemiconductorTestLibrary.InstrumentAbstraction.CustomInstrument;.
- Before calling the
Refer to the Custom Instrument Example - CleanupMyCustomInstruments Method in SetupAndCleanupSteps.cs as a reference for creating a Cleanup method.
Cleanup code workflow
4. Create High-Level Extension Methods
To perform operations on the instrument, you need to write high-level extension methods to extend the CustomInstrumentSessionsBundle class.
- Refer to Extending the Semiconductor Test Library for more specific instructions to get started.
- Add the following
usingdirectives at the top of your .cs file to reference the required classes from the library:using NationalInstruments.SemiconductorTestLibrary.Common;using NationalInstruments.SemiconductorTestLibrary.DataAbstraction;using NationalInstruments.SemiconductorTestLibrary.InstrumentAbstraction.CustomInstrument;
- Within each high-level extension method, make use of the
DoandDoAndReturnXXXmethods provided by theParallelExecutionclass to invoke driver methods in parallel across the various pins and sites.- The sessions bundle contains the instrument sessions and important site, pin, and channel information you will need to perform operations on the appropriate instrument channels.
- Refer to Making Low-Level Driver Calls for details.
- Implement separate extension methods to enable any and all instrument's driver API capabilities that should be used by the test program.
Note
The value of the Session property contained within the CustomInstrumentSessionInformation object is a generic object type, you will need to typecast it to the type of your concrete class implementation of ICustomInstrument.
Once typecasted appropriately, you will be able to access the driver reference stored within your concrete class and call the required driver APIs perform driver operations.
Tip
The concrete class implementation of ICustomInstrument can be developed to have methods that wrap the required driver API operations.
This is a good idea when working with driver APIs that are very low-level, and makes implementing the high-level extension methods much easier.
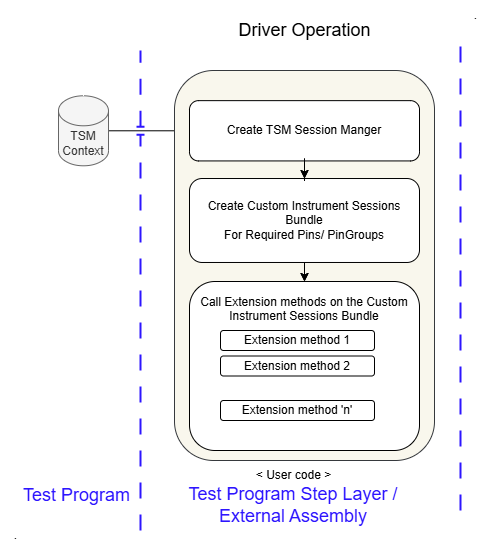
Refer to the Custom Instrument Example - HighLevelDriverOperations.cs as a reference.
Driver operation workflow
5. How to Configure the Pin Map
To configure the pin map definition for your custom instrument, you must identify any hardware or device driver constraints. This can be done by determining how the hardware device is reserved by the device driver and whether or not the instrument channels can operate independently within a single device (for example, in parallel threads). Typically, there are three possible configurations.
- Session per Channel
- Each instrument has unique session data for each channel.
- Each channel can be independently operated on in multiple threads, in parallel.
- This mode of operation is similar to an NI-DCPower instrument.
- Session per Channel Group
- Each instrument has two or more unique sessions, each containing a subset of channels that share a common session.
- For some devices, the subset of channels many only be operated on as a group within the same thread, and are not independent from one other within that group. However, the channel groups in each session can be independently operated on in multiple threads, in parallel.
- This mode of operation is similar to an NI-DAQmx instrument.
- Session per Instrument
- Each instrument shares session data across the entire instrument.
- Whether or not the channels can be interdependently operated on is dependent on the device and the device driver.
- This mode of operation is common for many instruments, including NI-DCPower instruments which can operate in multiple modes (Session per Channel and Session per Instrument).
Related information:
- TestStand Semiconductor Module User Manual - Natively Supported and Custom Instruments (TSM)
- TestStand Semiconductor Module User Manual - Custom Instruments (TSM)
Instructions
- Open the Pin Map Editor and select an existing pin map file or create a new one.
- Select
<Add Instruments Here>under the 'Instruments' definition within the Pin Map tree on the left side of the Pin Map Editor. - Select
Custom Instrumentfrom the 'Insert' options. - Provide the unique resource name or identifier required to instantiate a new session with the hardware using the device driver (i.e. the instrument's alias shown in the NI MAX software).
- Provide the unique
InstrumentTypeIdyou have defined for your custom instrument within the concrete custom instrument factory class implementing theICustomInstrumentFactoryinterface (from the 2. Create a Custom Instrument Factory Class step above). - Ensure
Custom Instrumentis selected for theInstrument Typefield. - Create a channel group and populate channel names according to the instrument hardware constraints mentioned above.
- Update the Connections table to map the instrument channels to the appropriate pins and sites.

Refer to the Custom Instrument Example - STLExample.CustomInstrument.pinmap as a reference.
Note
Unique reference is created for each channel group specified in pinmap.
Using Extension Methods Within Test Code Modules
Similar to the other natively supported instruments, you use the same workflow within your test code module, where you create a new sessions bundle object for the required pins and then invoke the extension methods on that bundle object.
- Create new instance of
TSMSessionManager.- Ensure you have the following
usingdirectives at the top of your .cs file to reference the required classes from the library:using NationalInstruments.SemiconductorTestLibrary.Common;using NationalInstruments.SemiconductorTestLibrary.DataAbstraction;using NationalInstruments.SemiconductorTestLibrary.InstrumentAbstraction;
- Ensure you have the following
- Create sessions bundle by calling
CustomInstrumentmethod ofTSMSessionManager, passing it both the target pin(s) and theInstrumentTypeIdas parameters. - Call the high-level extension methods you created based on the test method requirements.
- If your extension methods are not declared within the same namespace used by the test code module file, add the appropriate
usingdirective at the top of your .cs file to reference that namespace.
- If your extension methods are not declared within the same namespace used by the test code module file, add the appropriate
Tip
For convenience, you can add extension method to extend the TSMSessionManager class that wraps the CustomInstrument method for your specific Custom Instrument, so that you do not need to provide the InstrumentTypeId parameter.
Refer to the Custom Instrument Example - FunctionalTest Method in TestStep.cs as a reference.
Examples
There is a sequence style example available that showcases the implementation of a Custom Instrument.
This example can also be used as a template starting point for creating your own Custom Instrument.
Refer to the Custom Instrument Example README for more details.
This example is also installed on any system using STS Software 25.5 or later, under the following directory, C:\Users\Public\Documents\National Instruments\NI_SemiconductorTestLibrary\Examples\Sequence\CustomInstrument.